CWK features Stampin’ Up!® Merry Bold & Bright DSP & Alphabet a la Mode Dies
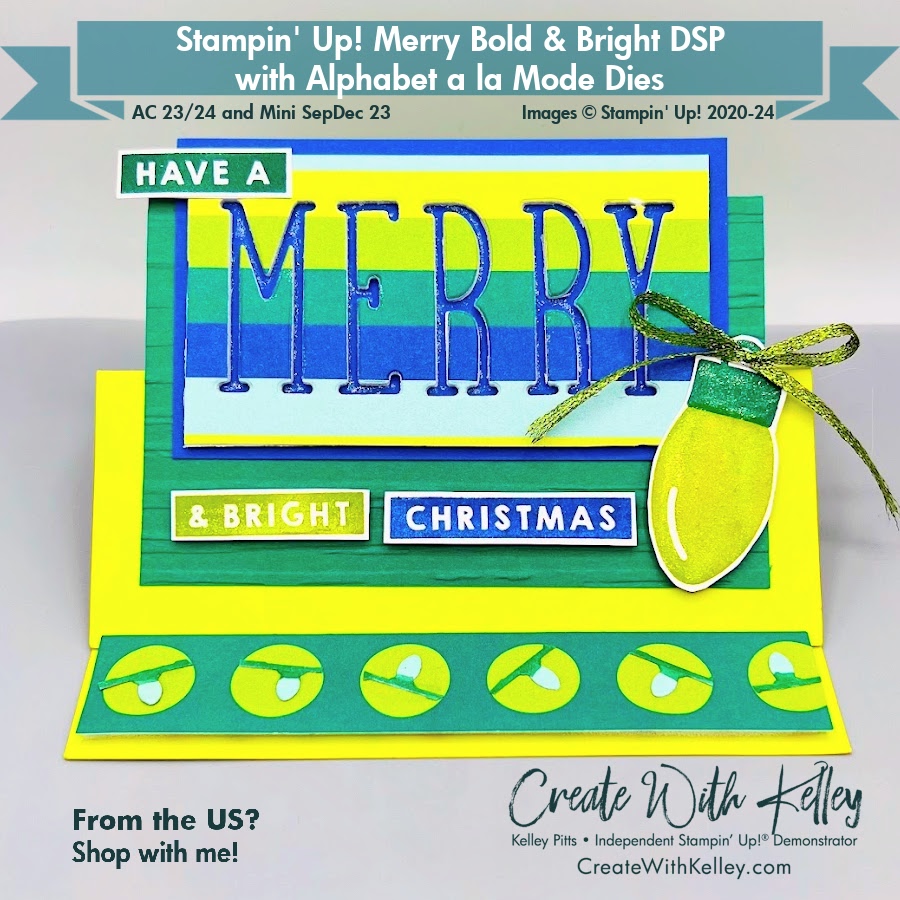
Creating this card was so FUN…especially since it was half of a “two-fer.” For this card I used the negative space from a sheet of Merry Bold & Bright DSP and saved the actual diecut letters (MERRY) to use on a different card that I’ll show you on a separate blog post. Stay tuned for that!
Aren’t these light bulbs the CUTEST? I just diecut the string of lights in Pool Party, colored the cord with Shaded Spruce Stampin’ Blends, then cut them apart to fit into the circles on the DSP strip that is popped up with Foam Adhesive Strips.
Measurements:
- Lemon Lime Twist cardstock base: 5 1/2″ x 8 1/2″, scored at 2 1/8″ and 4 1/4″ for horizontal easel card
- Shaded Spruce cardstock: 3″ x 4 3/4″
- Blueberry Bushel cardstock: 2 1/2″ x 4 1/4″
- Merry Bold & Bright DSP stripe: 2 1/4″ x 4″
- Merry Bold & Bright DSP dots: slightly less than 1″ x 5 1/4″ (I just cut multiple strips with even spacing between the rows of dots.)
- Basic White 3″ x 5 1/4″ plus scraps for light bulb and greeting strips on front
- Ribbon: 8 1/2″ ish
Instructions:
- Line up the bottom of the letters for MERRY and tape them together with equal spacing, making sure they’ll fit on the DSP.
- Adhere the DSP to Foam Adhesive Sheet cut to slightly smaller than the DSP.
- Carefully tape the letters to the DSP with Frog Tape or other sensitive removable tape then diecut the word out.
- Carefully peel the Frog tape and letters off the DSP, peeling it back onto itself instead of pulling up on it.
- Texture the Shaded Spruce cardstock with the 3d stripes embossing folder (that comes in a set with the splatters folder) or other embossing folder if desired.
- Diecut the light bulb string from Pool Party cardstock, then use Shaded Spruce Stampin’ Blends to color in the cord. Audition your string of lights and cut to fit one or two bulbs in each circle of the DSP, then adhere with liquid glue.
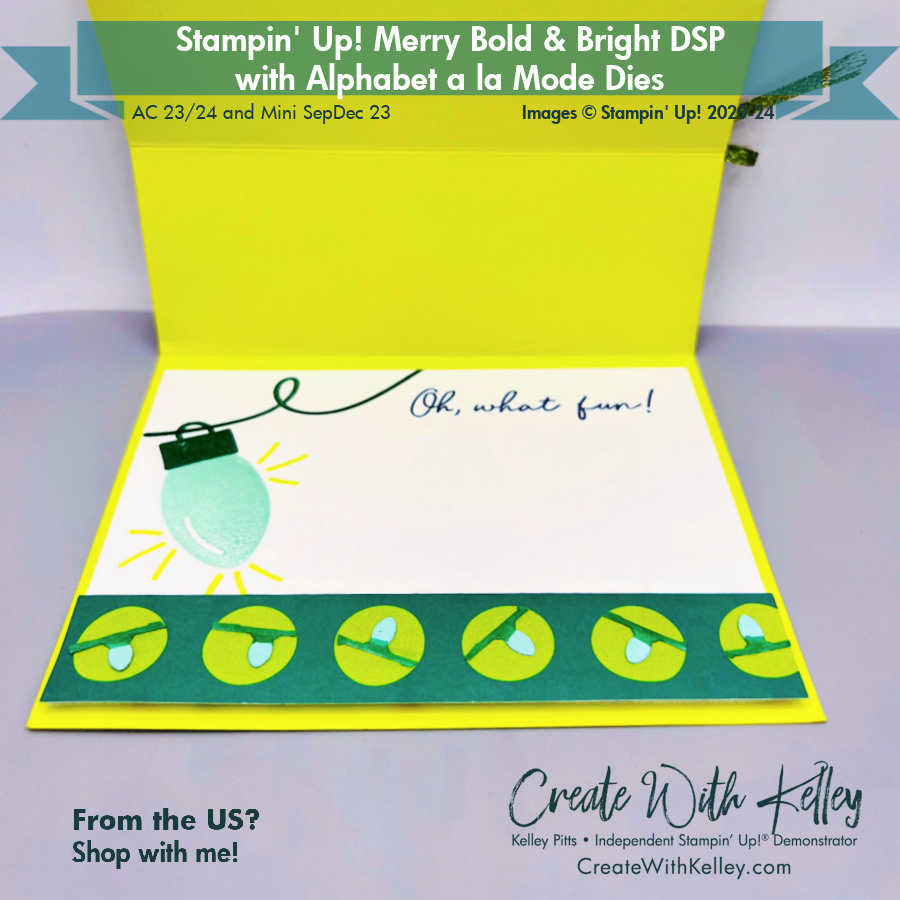
- Attach the completed light bulb strip to the bottom of the inside of the card with foam adhesive strips to form the easel for the folded cardfront to stand behind.
- Stamp the greetings and front light bulb (with base) onto white scraps then fussy cut them all out.
- Stamp the greetings inside onto the white layer and adhere between the scoreline and the bottom circles strip. (I used Pool Party for the bulb, Spruce for the cord and base, Lemon Lime for the glow marks and Blueberry for the greeting.)
- Audition all the layers before adhering each one to the front of the card.
- The Spruce layer leaves an even (ish) border on the sides and the bottom, so use that as your guide.
- Ensure that the top layers of the card don’t go outside the borders of the cardfront when it is flat.
- Peel the backing off and adhere the MERRY DSP/foam layer centered onto the Blueberry layer, making sure to add the inside of the R’s back into position.
- Attach the bottom 3/4 of the Blueberry layer to the top portion of the Spruce layer.
- Adhere only the bottom half of the Spruce layer to the bottom of the mountain folded cardstock that forms the front of the card.
- Adhere the Spruce HAVE A flat above the M, then add the Granny Apple & BRIGHT underneath the MERRY with a foam adhesive strip or Mini Dimensionals. (I lined up the left edge of it with the Blueberry layer.)
- Adhere the Blueberry CHRISTMAS beside the & BRIGHT with Minis, leaving room for the light bulb to be added with Dimensionals.
- Tie the bow and attach it to the top of the blight bulb with a glue dot.
- Add Wink of Stella inside the MERRY, onto the bulb and onto the circle strip with bulbs.
- See my September 30, 2023 LIVE at 10:30 am video with details on these links on my YouTube channel: Create With Kelley Pitts and my Facebook page: Create With Kelley.
Product List:
|
|
|||
|
|
|||
|
|
|
||
|
|
|
Typical Additional Basic Product List:
|
|
|
|
|
|
|
|
|
|
|
|
|
|
|
|
|
Just subscribe to my blog at CreateWithKelley.com and sign up through my Mailchimp form to receive emails about classes, etc.
I’d love to hear your comments and I’ll be happy to answer any questions. Thanks! Hope you’ll join me for in-person classes, Class-To-Go kits and online classes soon! FUN times ahead!
Kelley Pitts (Create With Kelley) Contact Information:
- Address: PO Box 64334, Lubbock, TX 79464-4334
- Cell: (806) 790-0061
- Email: kelley@createwithkelley.com
- Mailchimp Email signup . Please choose your email preferences when you signup.
- Website/blog/shopping/calendar: CreateWithKelley.com
- Facebook business PAGE (Create With Kelley) Please like/subscribe/follow and share my videos!
- Facebook GROUP (Create With Kelley Crew) Please join!
- Facebook & You Tube Lives via Streamyard: Saturdays at 10:30 am CST (unless otherwised notified)
- You Tube channel: Create With Kelley Pitts
- Pinterest: Create With Kelley


Leave a Reply