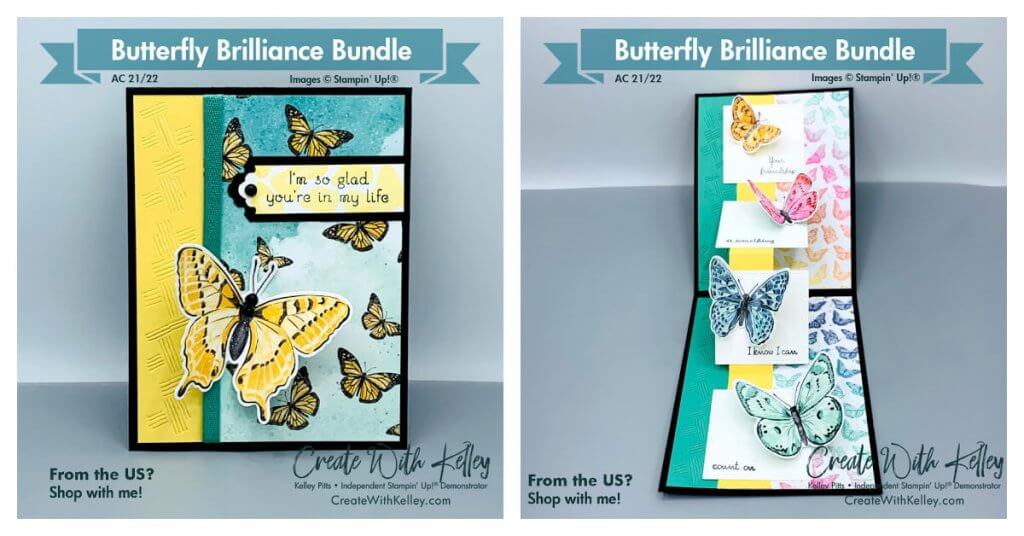
Butterfly Bouquet WOW Fold
 The beautiful Butterfly Brilliance Bundle allows your creativity to take flight! For you fortunate few who have the already retired Butterfly Bijou DSP, this card will be easier, but the rest of you can simply stamp the butterflies, color them in to coordinate with whatever DSP you choose for a background, and you’re in business!
Thanks to Kylie and Bruno for organizing this Blog Hop! I’m proud to be part of it.
Everyone, please hop to all the names on the list below to see how flexible and beautiful this bundle is!
Imagine how your special friend or family member will enjoy this card open on a desk or bookshelf for days/months/years to come!
You’ll find more of my cardmaking details underneath the following Blog Hop list.
- Thank you so much for coming by our Blog Hop today!
- We have an amazing line up of Stampin’ Up!® demonstrators from around the world who are working hard to learn how to be even more successful.
- We know you are going to love all the amazing projects that you’ll see today, so be sure you show us some love to encourage each of us to keep creating and sharing fantastic ideas with you.
- Be sure to click on every blog link so you don’t miss anything!
- Remember you are currently on the page featuring Kelley Pitts called CreateWithKelley.com.
- Simply click the next link below my name to know where to go next.
If you received this blog post by EMAIL click HERE to see the hop list on my actual blog post!
Full Blog Hop List:
Measurements:
- Basic Black card stock: 4 1/4″ x 11″, scored at 5 1/2″
- So Saffron card stock: 1 1/2″ x 5 1/4″ for front
- So Saffron card stock: 1″ x 11″, scored at 2 3/4″, 5 1/2″, 8 1/4″ for inside
- Just Jade card stock: 1 1/2″ x 5 1/4″ (2 pieces)
- Just Jade card stock scrap to diecut butterfly
- Butterfly Bijou or other DSP: 3″ x 5 1/4″ for front
- Butterfly Bijou or other DSP: 3″ x 5 1/4″ for inside (2 pieces)
- Basic White card stock: diecut into 2 1/4″ Stitched Shape Squares (4 pieces)
- Basic White card stock: 3/4″ x 3″ for greeting to be punched
- Basic Black card stock: 1″ x 3 1/4″ for greeting mat
- Butterflies from DSP to diecut or Basic White to be stamped, colored and diecut
- Just Jade 2020-2022 In Color Ribbon: 6 1/2″
Instructions:
- Cut and score cardstock and DSP per Measurements section above.
- Stamp Love of Leaves greetings onto diecut squares in Memento Black. (Strategically place greetings in opposite corners from butterflies per photo.)
- Punch one end of white and black strips with Lovely Labels Pick A Punch.
- Arrange inside leftover pieces from the Butterfly Brilliance Stamp set into a pattern on your block, then stamp white strip in So Saffron (stamped off first.)
- Stamp Love of Leaves greeting in Memento Black ink over the patterned white strip.
- Diecut hashtag texture from Brilliant Wings dies into Saffron and Jade strips as desired.
- Adhere front DSP to Saffron, overlapping edge to fit evenly on front.
- Add Stampin’ Seal or Seal Plus to the back of the panel where the ribbon will wrap around and cover the seam.
- Attach front panel to black card base.
- Add Wink of Stella over all the butterflies, then fold wings up on either side of the body and let dry.
- Texture Emboss the black strip if desired, then attach greeting to it with Dimensionals and glue flat it to front of card.
- Adhere Jade strips then adhere overlapping DSP inside card per photo.
- Fold Saffron strip (valley, mountain, valley) and attach to bottom of card with liquid glue about 1″ in, per photo.
- Close card with strip folded up on bottom to make sure everything works and is straight, then put glue on the top portion of the folded strip and close card, using a little pressure until top seals like bottom.
- Test where you want squares and butterflies before adhering them down, making sure the butterflies don’t “catch” on the square above, and that the greeting is visible.
- Top and bottom squares are glued flat. Only add glue to the yellow strip where the middle squares attach instead of adding glue to the back of the squares.
- Adhere butterflies using foam adhesive strips on the back of the body.
- Add matte black dots or other embellishment on card front as desired.
- I’m rushed getting this posted for the Blog Hop, so if something is missing let me know and I’ll come back and add it!
- You can also watch my Facebook Live video from March 31st to see how I made it. (https://www.facebook.com/CreateWithKelley)
 I hope you’ll also subscribe to my blog at CreateWithKelley.com . I’d love to hear your comments and I’ll be happy to answer any questions. I’m offering a full PDF tutorial on request from Kylie and Bruno’s Demonstrator Training group, or you’ll get it when you purchase my Butterfly Brilliance Class-To-Go. Thanks! FUN times ahead!
Product List:
|
|
|||
|
|
|||
|
|
|
|
|
|
|
|
|
|
|
|
|


Beautiful card, love how you incorporated the fun fold!
Thanks so much! So sad they sold that paper out so quickly!
Gorgeous card Kelley! Great idea to do the ‘stepped’ inside too! 🙂
Thanks so much! So sad they sold that paper out so quickly!
Love this card! Thank You for sharing your talents with us
Thanks so much! Thanks for enjoying my classes and sharing your talents with all of us too!
So beautiful Kelley! I love how the so saffron just pops, the hashtags are so effective on that strip. Great design, thx for your inspiration 🙂
Thanks so much! I love to inspire people!
I’ve gotta try the hashtag on other cards too. I used the small circle die from the Butterfly set to make bubbles for a whale card.
Such a detailed and vibrant card! Thank you Kelley for taking part in our Butterfly Bouquet Demonstrator Training Blog Hop this month.
Kylie, thanks for the compliment. (I didn’t realize just how detailed it was until I made 14 of them for a swap. Ha! Not again! Simple swaps from now on!)
This is a wow card, Kelley! I’m going to give this fun fold a try.
Great! So happy I inspired you to try a new fun fold!
Fabulous card!!! Love this!!😊
Thanks so much! It was fun to make one. I just don’t recommend making 14 at one time for a swap. Ha!