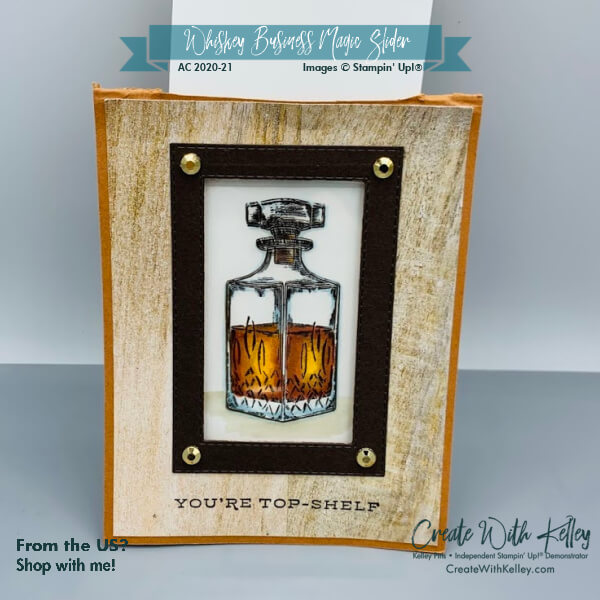
Stampin’ Up!® Whiskey Business Magic Slider Card
The Stampin’ Up!® Whiskey Business stamp set screamed Magic Slider Card Technique to me!
This photo shows you the magical ending with the slider pulled out. (My apologies that my card looks a bit ragged, worn and unglued since it’s the template we used in my recent Techniques class.)
 This is my first time to participate in Kylie’s International Blog Highlights, so after you figure out all the details in this slider card I hope you’ll take time to vote for me by clicking here: https://bit.ly/KyliesInternationalHighlightsNovember2020VoteForMeHere
The top ten winners based on your votes will be able to participate in the actual International Blog Hop at the end of November. My goal is to make it into the top ten one month this year!
Back to my card…I hadn’t made a Magic Slider Card in years, so I watched several videos before deciding how I wanted to try a little Whiskey Business with that technique. I mostly followed the layout/template from StampedAF – Ashley Fifer who made a Jar of Flowers magic card. I tweaked her card a little, made some mistakes and then left my card unattached so I could share the inside mechanism with my Techniques class. I’ll attach my instructions if you’re interested in giving it a try. (Make sure you have a Window Sheet and Stazon as well as Memento and Stampin’ Blends on hand before you settle in to make one.)

This photo shows magic in progress with the slider pulled halfway out.
Showing my Techniques class attendees how to play with Stampin’ Blends in various browns, oranges and yellows required a little whiskey research. This West Texas farmgirl loves the rich fall colors that a big bottle of Jack Daniels showcases…especially when we get to sample a little for cardmaking inspiration! Playing with various Blends color combos (Cinnamon Cider, Cajun Craze, Pumpkin Pie, Mango Melody andPool Party or Balmy Blue) and layering them to color the decanter and glasses produced Top Shelf results. (Wink!) Using Pool Party or Balmy Blue blends on the glass really adds interest. Using more yellow tones inside the ice cubes and adding darker areas around the outside of each cube adds realism.
It’s amazing how tiny touches can make such a difference. Adding the Gilded Gems to the card allowed me to jazz it up without losing the more masculine feel to it.

This photo looks kinda empty before the magic happens when you pull the slider out.
In order to have room to write a message, I attached a folded back piece so the message could be on the inside instead of on the very back of the initial card. Since I scored the front card stock to give more room for the slider to go through, I made the back attachment piece the same size as the smaller of the two score lines.
Measurements, instructions and product list are below but before you head off to make this card., but please vote for me first at this link if you like my card. Thanks! https://bit.ly/KyliesInternationalHighlightsNovember2020VoteForMeHere
Measurements:
- Cinnamon Cider card stock: 4 1/4″ x 11, scored at 5 3/8″ and 5 5/8″; plus a back attachment piece of 4 1/4 x 10 3/4″, scored at 5 3/8″
- In Good Taste DSP: 4″ x 5 1/8″ ish
- Whisper White card stock: 2 1/2″ x 3 3/4″ for image and 2 3/4″ x 4 1/4″ for slider mechanism; thin strips for inside “stoppers”, 3 3/4″ x 5″ piece for inside of back attachment
- Window Sheet: 3 3/4″ x 4 3/4″
- Early Espresso card stock: 3″ ish x 4 1/4″ ish to cut down with Stitched Rectangle (or cut out of the inside of the back inside greeting); 4 x 5 1/4″ piece for inside greeting; scrap to punch out (or punch out of inside greeting piece.)
- Faux Suede Trim: 6″
Instructions:
I plan to do a video since I designed my card a little differently than StampedAF – Ashley Fifer did, but just in case you read this before I post a video, please watch hers and use your imagination. I think it’s easier to watch a video than try to understand how to make this card in a PDF tutorial. But, let me know if you need instructions! Thanks!
Product List:
|
|
|||
|
|
|
|
|
|
|
|
|
|
|
|
|
|
|
|
|


Leave a Reply