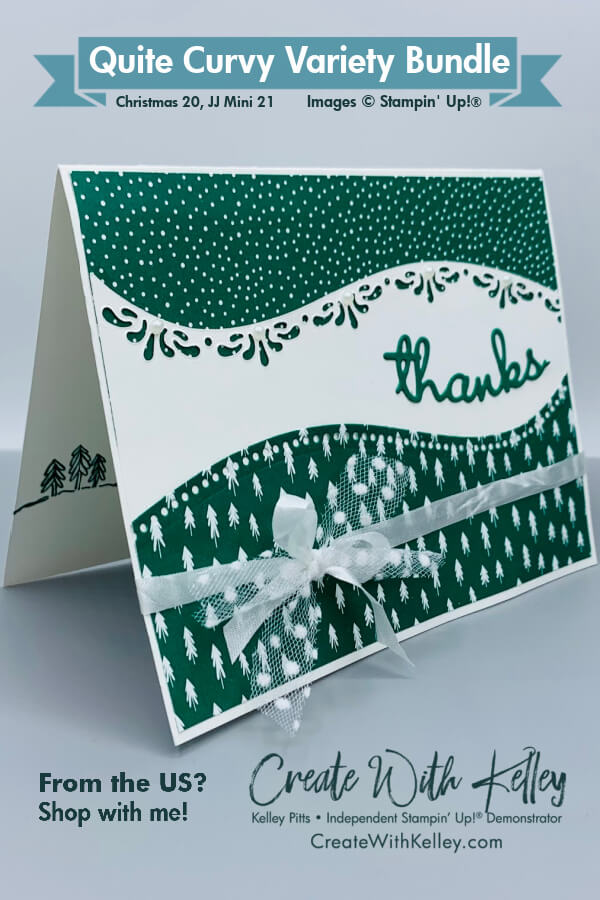
Demonstrator Training Program Blog Hop November 2020 – Quite Curvy Variety Bundle
Thank you for joining our Stampin’ Up!® Demonstrator Training Program Monthly Team Blog Hop for November 2020! Whether you started with my site for Kelley Pitts at CreateWithKelley.com or you started with another demonstrator, you can easily hop to all the other demonstrator sites at the bottom of this post. We are so happy that you could join this month’s blog hop for ideas and creative inspiration. We are a group of Stampin’ Up!® Demonstrators from around the world who are taking part in a training program to help us to build a successful Stampin’ Up!® business and reach some goals we have set. We really appreciate your support. This month we’re featuring cards we send to team members or customers. Any customer who orders from me this month will receive my card as a Thank You!
I’m so excited today to finally get to play with my Quite Curvy Variety Bundle , which includes the Quite Curvy Bundle, the Curvy Christmas Photopolymer Stamp Set, and the Classic Christmas Designer Series Paper at a 10% discount. This set will be really versatile for various seasons, but since the Christmas stamps and paper are only available for a limited time, now’s the time to order.
This card was my very first attempt at using the Quite Curvy dies so I tried a simple layout. I didn’t have a chance to try alternative ways to do it, so you may want to experiment before you do it this way. I’ve watched several You Tube videos with various tips for using the dies, so I found it was EASY!
Measurements:
- Thick Whisper White cardstock – 5 1/2″ x 8 1/2″, scored at 4 1/4″
- Whisper White cardstock – 2″ x 6″
- Snowy Classic Christmas DSP 2″ x 5 3/8″
- Trees Classic Christmas DSP 2″ x 6″
- Shaded Spruce cardstock scrap
- White Ribbon: 21″
- Polka Dot Ribbon: 2 pieces 5″ each
- Pearls -5-6
You’ll find the instructions and supply list underneath the following Blog Hop list. Thanks!
Thank you so much for coming by today! We have an amazing line up of Stampin’ Up!® demonstrators from around the world who are working hard to learn how to be even more successful. We know you are going to love all the amazing projects that you’ll see today, so be sure you show us some love to encourage each of us to keep creating and sharing fantastic ideas with you.
Be sure to click on every blog link so you don’t miss anything! Remember you are currently on the page featuring Kelley Pitts called CreateWithKelley.com. Simply click the next link below my name to know where to go next. If you received this blog post by EMAIL click HERE to see the hop list on my actual blog post!
Full Blog Hop List:
Instructions:
- Line the “filigree” die up at the top right of the white strip with the rounded curve even with the top of the strip, making sure the solid cut line is at the top.
- Do the same with the “dots” die on the “trees” strip, then you can diecut both strips in one pass.
- Glue the “snowy” DSP strip to the top of the card base with an even border around.
- Flip the white strip over so that it curves the opposite way from the “trees” strip if you want the look I have. Take care to cut the DSP down to 5 3/8″ on the correct side that you’ve decide to cut off. In my mind this kinda looked like a snowbank between a snowy sky and trees beneath, so I chose this method. (See photo below.)
- Or keep the curves parallel if you prefer a more linear look. Just play with the curves to see what you like best before you trim them off. You may have to make the white strip larger in order to fit your “Thanks” in properly if you like this look best. Again, take care to cut off the correct end of each strip to 5 3/8″. (See photo below.)
- Wrap the seambinding ribbon around the “trees” DSP and tie the bow before you glue the strip to the bottom of the card front, leaving the top curve unglued so you can tuck the middle white layer underneath it when you get it positioned properly.
- Adhere the white layer, then add pearls if desired.
- Diecut your Thanks (or preferred sentiment) from Shaded Spruce cardstock scrap that is backed with an adhesive sheet, then match your curve when you adhere it. If it won’t curve exactly right you can just make a tiny slit where it needs to “give”.
- When the Classic Christmas DSP is retired you could make a similar card using other DSP and cardstock that is available when you shop anytime in my online store. Feel free to contact me today to help you unleash your creativity. Fun times ahead!
Product List:
|
|
|||
|
|
|
|
|
|
|


Cute card, thanks for sharing! I like how you stamped the trees on the inside to match the tree Designer Series Paper.
Thanks so much! Glad you noticed that little touch. Have a great week!
Great card, Kelley! 🙂
Thanks for the compliment and for taking time to comment. Have a great week.
Lovely card. Tfs
Thanks for the compliment and for taking time to comment. Have a great week.
Very pretty.
Thanks so much!
Love your card! I need to play with this bundle
Thanks so much. Yes, you do! I’d love to see what you come up with.
Yes, you do! I’d love to see what you come up with. Thanks!